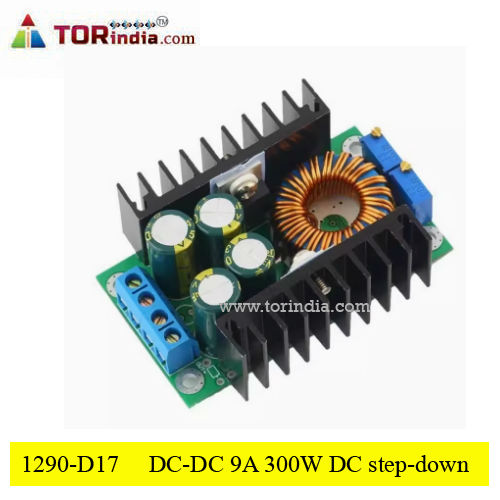
Adjustable power supply (12A power is large enough), high-power LED driver, LED display driver, lead-acid battery charging, lithium battery charging, vehicle power supply, vehicle laptop power supply (step-down), regulated power supply, low-voltage system power supply, (such as children Toy car uses 12V battery to step down to 6V), 24V to 12V 12A 12V to 5V 12A 24V to 5V 12A 24V to 19V20V, etc. The application range is very wide.
1. The fixed turning light current is 0.1 times the constant current value (used to identify whether the battery is full when charging);
2. A dedicated reference IC and high-precision sampling resistor are used to make the constant current more stable (the temperature drift is less than 5% when the constant current is 5A from 20 degrees to 60 degrees). Especially suitable for LED driver
3. The output current is large, and the output current can reach 12A, meeting most needs.
4.4 high-frequency capacitors, effectively reduce output ripple and improve working stability
5. Double heat sink design, MOS tube Schottky diode independent heat sink, good heat dissipation, no influence on each other
6. Use large-size iron-silicon-aluminum magnetic rings at all costs to improve work efficiency, and use pure copper double wires to reduce heat generation and improve efficiency.
7. 3296 multi-turn potentiometer, with high voltage and current adjustment accuracy and good stability.
8. The special current sampling resistor has high current sampling accuracy, good stability and small temperature drift. LED .
9. Two-color indicator light, the working status is clear at a glance. Charge.
10. The voltage and current are both adjustable, and the effect of making an adjustable power supply is good. The 12A current is large and the power is sufficient.
Module parameters
Module properties: non-isolated step-down constant current and constant voltage module (CC CV) charging module
Scope of application: high-power LED constant current drive, lithium battery charging (including ferroelectric), 4V, 6V, 12V, 14V, 24V battery charging, nickel-cadmium nickel-hydrogen battery (battery pack) charging, solar panels, wind turbines
Input voltage: 7-32 V (without constant current 5-32V)
Output voltage: ( 1) Continuously adjustable ( 0.8-28V )
(2) Fixed output ( any choice between 0.8-28V ) , please inform the shopkeeper when purchasing. (Temporarily only for batch customers, all samples will be sent with adjustable models)
(3) If you need higher voltage, please contact me directly
Output current: 12A (please add a fan to dissipate heat if the power tube temperature exceeds 65 degrees. Generally, no fan can be used in an open environment within 24V to 12V 6A)
Constant current range: 0.2-12A (adjustable) ( those without constant current do not have this function)
Turning light current: constant current value * (0.1), turning light current is linked to the constant current value , for example, the constant current value is 3A, and the turning light current is set to 0.1 times of the constant current (0.1*3A=0.3A) . When setting the constant When the current value is adjusted to 2A, the turning light current is 0.1 times the constant current (0.1*2A=0.2A).
The second version is fixed at 0.1 times (the actual turning light current is an approximate value and not very), which is used to indicate whether the charge is full.
Differential voltage: 1V
Output power: The power is about 300W. If the temperature of the power tube exceeds 65 degrees, please add a fan.
Conversion efficiency: about 95% (the higher the output voltage, the higher the efficiency)
Working frequency: 300KHZ
Output ripple: 20M bandwidth (for reference only)
Input 24V, output 12V 5A, ripple about 50mV (excluding noise)
Working temperature: industrial grade (-40? to +85?) (please pay attention to the power tube temperature in actual use. If the temperature is too high, please strengthen heat dissipation)
No-load current: typical 20mA (24V to 12V)
Load regulation: ±1 % (constant voltage)
Voltage regulation: ± 1%
Constant current accuracy and temperature: In actual testing, the temperature on the module changed from 25 degrees to 60 degrees, and the constant current value changed less than 5% (constant current value 5A)
Dynamic response speed: 5 0uS
Potentiometer adjustment direction: clockwise (increase), counterclockwise (decrease). The potentiometer close to the input is voltage adjustment (CV), and the potentiometer close to the output is current adjustment (CC).
Indicator light: Two-color indicator light, the charging indicator light is red, the charging completed indicator light is green (no load is connected, the indicator light is green), the indicator light without constant current is red.
Output short circuit protection: yes, constant current (currently set constant current value)
Input reverse polarity protection: None,
Output backflow prevention: None.
Wiring method: terminal block
How to use battery charging:
1. Determine the float voltage and charging current of the rechargeable battery you need, and the input voltage of the module;
2. Adjust the constant voltage potentiometer to adjust the output voltage to about 5V.
3. Use a multimeter with a 10A current block to measure the output short-circuit current, and adjust the constant current potentiometer to make the output current reach the predetermined charging current value;
4. Adjust the constant voltage potentiometer to make the output voltage reach the floating voltage;
5. Connect the battery and try charging.
(Steps 1, 2, 3, and 4 connect the module input to power, and the output is unloaded and does not connect to the battery.)
How to use LED constant current driver:
1. Determine the working current and working voltage you need to drive the LED;
2. Adjust the constant voltage potentiometer to adjust the output voltage to about 5V.
3. Use a multimeter with a 10A current block to measure the output short-circuit current, and adjust the constant current potentiometer to make the output current reach the predetermined LED operating current;
4. Adjust the constant voltage potentiometer to make the output voltage reach the LED working voltage;
5. Connect the LED and test the machine.
(Steps 1, 2, 3, and 4 connect the module input to the power supply, and the output is unloaded and does not connect to the LED light.)