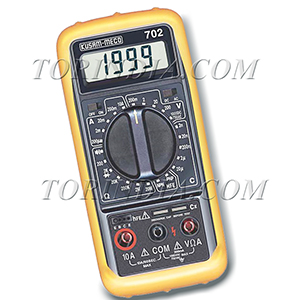
SAFETYINFORMATIOMN The following safety informationmust be observed to insure maximum personal safety during the operation at thismeter:1.Do not usethe meter if the meter or test leads look damaged, or if you suspect that themeter is not operating properly.2.This meteris not recommended for high voltage industrial use: For example not formeasurements of 750VAC or 1000VDC industrial power main. Accidental misuse byconnection across a high voltage, high energy powers source when the meter isset up for mA measurement may be very hazardous. 3.Turn offpower to the circuit under test before cutting, unsoldering, or breaking thecircuit small amounts of current can bedangerous.4.Usecaution when working above 60VDC or 30VACrms. Such voltages pose a shockhazard.5.When usingthe probes keep your fingers behind the finger guards on the probes.6.Measuringvoltage, which exceeds the limits of the Multimeter, damage the meter andexpose the meter voltage limits as stated on he front of the meter.OPERATIONBeforetaking any measurements, read the safety information section. always examinethe instrument for damage, contamination (excessive dirt grease etc)and defectsexamine the test leads for cracked or frayed insulation. if any abnormalconditions exits do not attempt to make any measurements.VOLTAGEMEASUREMENTS 1.Connectthe red test lead to the "VohmA" jack and the black test leads to the:COM" jack.2.Set thefunction/Range switch to the desired voltage range and slide :Ac/DC"selector switch to the desired voltage is not known setswitch to the highestrange and reduces until a satisfactory reading obtained.3.Connectthe test leads to the device or circuit being measured.4.For dc,a(-) sybolm sign is displayed for negative polarity, positive polarity implied.CURRENTMEASUREMENTS1.Set thefunction/range switch to the desired current range and slide "AC/DC"selector switch to the desired current type 2.Forcurrent measurement less than 200mA, connect the red test lead to the"COM" jack3.forcurrent measurements of above 200mA or greater connect the red test lead to the10A jack and the black test lead to the "COM" jack4.Removepower from the circuit under test and open the normal circuit under test andopen the normal circuit path where the measurement is to betaken. connect themeter in series with the circuit.Resistanceand continuity measurements1.Set thefunction/range switch to the desired resistance range or continuity position.2.Removepower from the equipment under test.3.Connectthe red test lead to the "VohmA" jack and the black test lead to the"COM" jack4.Touch theprobes to the test points. In ohms the value indicated in the display is themeasured value of resistance. in continuously, if the resistance is less than30ohm.DIODETESTS1.Connectthe red test lead to the :VohmA" jack and the black test lead to the"COM" jack 2.Set thefunction/Range switch to the " " position.3.Turn offpower to the circuit under test.4.Touchprobes. if the diode, A forward voltage drop is about 0.6V (typical for asilicon diode)5.Reverseprobes. if the diode is shorted, "000" or another number isdisplayed.6.If thediode is open, "1"is displayed in both directions.7.If thejunction is measured in a circuit and a low reading is obtained with both leadconnections: A resistance of less than 1Kohm may shunt the junction. in thiscase the diode must be disconnected from the circuit for accurate testing.TRANSISTORGAIN MEASUREMENTS1.Set the function/Rangewitch to the desired hFE range (PNP or NPN type transistor)2.Neverapply an external voltage to the hFE sockets. Damage to the meter may result.3.Plug thetransistor directly into the hFE sockets are labeled E, B and C for emitter,base and collector.4.Read thetransistor hFE (dc gain) directly from the display.CAPACITANCEMEASUREMENTS1.Set thefunction/Range switch to the desired C (capacitance) range.2.Neverapply an external voltage to the Cx sockets. Damage to the meter may resultinsert the capacitance directly from the display.